Saturday, December 18, 2010

Quinoa: It's What's for Breakfast!


Quinoa? For breakfast? Yup! It's true!!! In an effort to be healthier and feel better in general I am avoiding gluten at all costs. I've been making super delicious smoothies for breakfast but with the cooler weather I'm pretty much done with freezing cold breakfasts! I've been looking for some sort of warm breakfast that didn't include eggs or wheat and PRESTO! Martha Stewart hooked me up! Check out the January issue of MSLiving for more recipes but here's one that I've tried and adapted!

Here is the recipe for a tasty & gluten/dairy free breakfast:

1/2 c. cooked quinoa (or however much you want to eat!), heated
1/4 c. rice milk (or whatever amount makes the cereal wet enough for you)
Handful of blackberries
Handful of nuts (almonds, pecans or walnuts are best)
1 tbsp honey

1. Heat quinoa in a bowl. Pour your "milk" over the quinoa.
2. Load it up with the nuts, berries and honey

Note: The original recipe uses chopped avocado instead of berries and it was equally as delicious!

Sunday, November 21, 2010

Chicken Cacciatore with Crispy Polenta


A Close-up!


From Above


Dinner tonight was DELICIOUS! I cooked a delicious combo of Chicken Cacciatore and Crispy Polenta that will blow your mind! Start off with getting the polenta ready because it can cool while the chicken is simmering. Get your favorite apron on...it's time to cook!

Crispy Polenta

2 tbsp olive oil
2 cups chicken stock
2 cups water
1 teaspoon salt
1 cup coarsely ground yellow corn meal
1/4 teaspoon freshly ground black pepper
1 cup finely grated Parmesan
2 tablespoons butter
Olive oil, for brushing

1. In a large heavy saucepan, heat the olive oil, chicken stock, water and salt to a boil over medium-high heat. Reduce the heat, and when the liquid is simmering, gradually sprinkle the corn meal over in a very slow, thin stream, whisking constantly in the same direction until all the grains have been incorporated and no lumps remain. Reduce the heat to very low. Switch to a wooden spoon and stir thoroughly every 1-2 minutes for 25 to 30 minutes, or until the mixture pulls away from the sides of the pan and the grains of polenta have softened. Stir in the pepper, Parmesan and butter. The mixture will be very thick!
2. Rinse an 8x12-inch roasting pan with water and shake dry. Mound the polenta into the pan and, using a rubber spatula repeatedly dipped in hot water, spread the polenta evenly in the pan until it is just under 1/2 inch thick. Cover with a tea towel and allow to rest for 1 hour at room temperature or up to 24 hours in the refrigerator.
3. When you're ready to serve, preheat the broiler to high heat. Line a cookie sheet with foil and brush the foil with olive oil.
4. Cut the polenta into 8 equal squares and brush them with olive oil. Transfer the polenta to the cookie sheet and grill for 8 minutes on each side, or until deep golden brown. Serve immediately.

Chicken Cacciatore

1 whole chicken, cut into 8 pieces (discard the back or freeze it to use in making stock)
2 tsp salt
1 tsp ground black pepper
1/2 c. all purpose flour
3 tbsp olive oil
5-6 medium brown mushrooms, chopped
1 onion, chopped
3 cloves garlic, minced
3/4 c. dry white wine
1 (28 ounce) can diced tomatoes with juice
3/4 c. chicken broth
3 tbsp drained capers
1 1/2 tsp dried oregano leaves
1/2 tsp dried basil leaves

1. Sprinkle the chicken with 1 teaspoon salt and pepper. Dredge the chicken pieces in the flour to coat lightly.
2. In a large, heavy soup pan, heat the oil over a medium-high heat. Add the chicken pieces to the pan and saute just until brown, about 5 minutes per side. If all the chicken does not fit in the pan, saute it in 2 batches. Transfer the chicken to a plate and set aside.
3. Add the mushrooms, onion and garlic to the same pan and saute over medium heat until the onion is tender, about 5 minutes. Season with salt and pepper. Add the wine and simmer until reduced by half, about 3 minutes. Add the tomatoes with their juice, broth, capers, oregano and basil. Return the chicken to the pan and turn them to coat in the sauce. Bring the sauce to a simmer. Continue simmering over medium-low heat until the chicken is just cooked through, about 30 minutes.
4. Serve with crispy polenta and enjoy!

Thursday, November 11, 2010

Pies Galore!!!!!


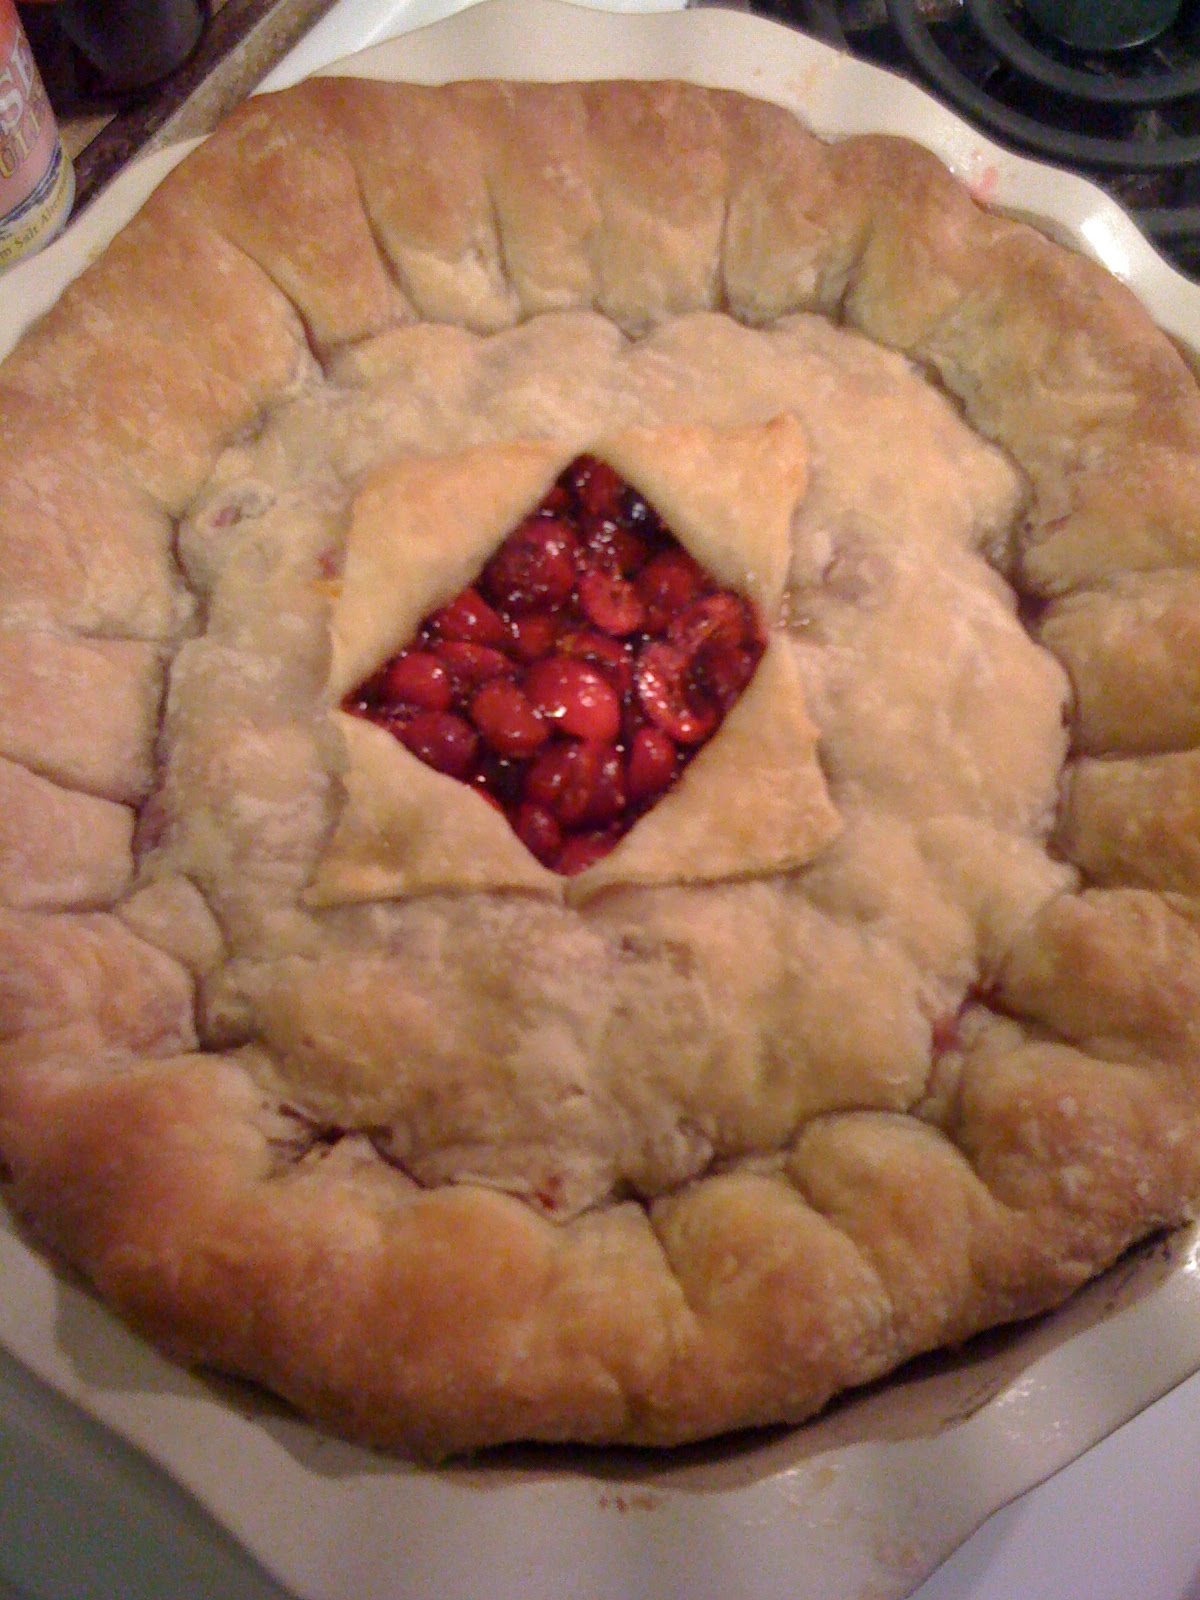
PIES!!!! It's PIE season!!!! WAHOO!!!!!!! As many of you know, this Saturday I am hosting my annual Festival of Pies and I have been baking like a maniac! I am currently baking pie number 8, Lemon Pucker Pie, and I have nine more to go! Three will be made the day of and I can't wait to pull them out of the oven to please the drooling crowd!!!! I'll be adding recipes as I go but I had to share at least one picture with my blog folks! The above is the Cranberry Window Pie from The Pie and Pastry Bible. The recipe will follow soon but check back periodically for more pictures and fun-time recipes!!!!!

Here's the list of pies:

1. Pumpkin Pie
2. Lemon Pucker Pie
3. Cranberry Window Pie
4. Honeycomb Chiffon Pie
5. Chocolate Cream Pie
6. Chocolate S'more Pie
7. Grape & Pear Pie
8. Gingery Apple Crumb Pie
9. Walnut & Date Torte
10. Piroshki
11. Turkey Curry Pies
12. Apple & Blackberry Pie
13. Buttermilk Chess Pie
14. Shoofly Pie
15. Swiss Chard, Raisin & Pine Nut Tart
16. Apricot Cheesecake Tart
17. Fig Tart with Mascarpone

Three cheers for PIES!!!!!!!!

The Recipes:
Piroshki

Pastry:
31/2 c. sifted flour
1 tsp. baking powder
1 tsp. salt
½ c. butter
2 eggs
1 c. thick sour cream

Filling:
1 large onion, finely chopped
4 tbsp. butter
1 lb. ground beef
Salt
Pepper
2 tbsp. minced fresh dill
1 tbsp. flour
2 hard-boiled eggs, chopped

Heat oven to 375F

For the pastry:
1. Sift flour with baking powder and salt.
2. Work in the butter with a pastry blender.
3. Beat the eggs very slightly; mix with the sour cream; then add to the flour and stir till dough is thoroughly mixed. It should be quite smooth but not stiff to handle.
4. Roll out to less than ¼ inch thickness. Cut with a 5-inch cookie cutter and fill with 1-11/2 tbsp. filling

For filling:
1. Saute the onion for 5 minutes in 1 tbsp. butter; then add the remaining butter, heat and add the meat. Brown the meat. Salt and pepper to taste.
2. Add the minced dill and stir.
3. Sprinkle with flour and cook for 1-2 minutes. Add 1-2 tablespoons water if mixture is dry.
4. Cool and add chopped eggs

Cut and fill pockets of dough. Wet one half of the edge of dough with water, fold over dough and pinch to close (or you can be fancy). Bake on a cookie sheet at 375F for 15 minutes, until golden on the edges.

Grape & Pear Pie

1 recipe pastry for double-crust pie
1/3 c. all-purpose flour
¼ c. packed dark brown sugar
2 tbsp. butter, melted
1 tsp. finely shredded orange peel
5 cups whole seedless red or black grapes
2 medium red pears, cored and sliced
1 egg white

1. Preheat oven to 375F. Prepare you pastry. For filling, in large bowl stir together brown sugar, flour, melted butter and orange peel. Add grapes and pear slices. Toss.
2. Roll out one disc of dough and line a pie pan, making sure to press dough up against the walls of the pan. Trim even with the edge of the pan.
3. Pour filling into the pastry.
4. Roll out remaining dough and place on top of filling. Trim to ½-inch beyond the edge of a pie plate. Fold over and pinch to seal. Cut slits in top pastry to allow steam to escape. Place on baking sheet.
5. Cover edge of the pie with foil. Bake 35 minutes; remove foil. Bake 35-40 more minutes or until top of pastry is golden and steam is escaping from slits in top crust. Remove from oven. Cool 6 hours. Store, loosely covered, in refrigerator up to 24 hours.


Swiss Chard, Golden Raisin and Pine Nut Tart

½ c. Golden raisins
1 c. water
2 lb. red Swiss chard, stems and center ribs discarded
1 large egg
½ c heavy cream
1 ½ tbsp granulated sugar
½ tsp. finely grated fresh lemon zest
1/3 c. pine nuts, toasted
Pastry dough for a double crusted pie

Special equipment: 10” by 1” round tart pan

1. Bring raisins and water to a boil in a 1-quart heavy saucepan, then remove from heat and let stand, covered, 1 hour. Drain in a colander, then pat dry with paper towels. Put oven rack in the middle of the oven and preheat to 400F.
2. Blanch Swiss chard in a large pot of salted boiling water, uncovered, stirring occasionally, until tender but still bright green, about 5 minutes. Transfer chard with a slotted spoon to a large bowl of ice and cold water to stop cooking. Drain chard in a colander, then squeeze out excess water by handfuls. Coarsely chop chard.
3. Whisk together egg, cream, granulated sugar, zest, and a pinch of salt in a large bowl. Stir in pine nuts, raisins and chard until combined.
4. Roll out one disc of dough to fill tart pan and hang over the edge of the pan at least ½ inch. Fill evenly with chard mixture. Roll out second disc of dough and trim. Crimp edges together. Using a fork, poke stem vents in the top of the tart. Bake until top is golden, about 1 hour. Allow to cool for 10 minutes to an hour and serve.


Walnut-Date Torte

¼ c. boiling-hot water
1 ½ c. pitted dates (1/2 lb.), finely chopped
1 ½ c. walnuts (5oz.)
¾ c. sugar, divided
2/3 c. matzo meal
1 tbsp. grated orange zest
½ tsp. ground cardamom
¼ tsp. salt
4 large eggs, separated, at room temperature 30 minutes
Accompaniment: Whipped cream

1. Preheat oven to 350F with rack in the middle. Generously grease a 9-by-2-inch round cake pan with softened butter or vegetable oil and dust with matzo meal, knocking out excess.
2. Pour hot water over dates in a large bowl and let stand 15 minutes to soften.
3. Pulse walnuts in a food processor until chopped, then add ¼ c. sugar and pulse until nuts are finely ground. Add matzo meal (2/3 c.), zest, cardamom, and salt and pulse until combined.
4. Beat egg whites with a pinch of salt in a bowl using an electric mixer at medium-high speed until just hold soft peaks. Add remaining ½ c. sugar in a slow stream, beating until whites hold stiff glossy peaks.
5. Whisk yolks into date mixture. Fold one third of yolk mixture into whites, then fold in remaining yolk mixture gently but thoroughly. Fold all of nut mixture into batter.
6. Spoon batter into cake pan and bake until golden and springy to the touch and cake just begins to pull away from side of pan, 35-40 minutes. Cool in pan on a rack 30 minutes, then invert onto rack and cool completely.

Turkey Curry Pie

½ lb. ground turkey
1 tbsp. soy sauce
½ tsp. sugar
¼ tsp. salt
1 tsp. vegetable oil
1 medium onion, chopped (1 cup)
1 tbsp. curry powder
1 large russet potato, peeled and cut into ¼ inch pieces (1 cup)
4-6 brown mushrooms, stems removed and cut into ¼ inch pieces
4 tbsp. butter
6 tbsp. water
2 (17 ¼ ounce) packages frozen puff pastry, thawed
1 large egg, lightly beaten

1. Mix together turkey, soy sauce, sugar, and salt with your hands until combined well. Heat oil in a 10-inch nonstick skillet over moderately high heat, add turkey and cook, stirring occasionally and breaking up beef into small pieces, until just browned, about 4 minutes. Remove turkey from the pan and drain.
2. To the pan, add butter, allowing it to melt, and add onion and cook, stirring occasionally until softened, 3-5 minutes. Add mushrooms and cook until they are softened and browned, 5-8 minutes. Add curry powder and potatoes and cook, stirring occasionally until potatoes are translucent, 3-5 minutes. Add water and cook, stirring and scraping up brown bits from the pan, until liquid is absorbed and potatoes are tender, about 1 minute. Return turkey to the skillet and stir. Cool, stirring occasionally, about 30 minutes.
3. Put oven racks in upper and lower thirds of oven and preheat to 400F. Line 2 large baking sheets with parchment.
4. Roll out one sheet of dough into a 12-inch square. Cut into four equal pieces or cut out four 5-inch rounds with a cookie cutter. Mound 1/3 cup of filling into the center of two pieces of pastry. Brush edge with beaten egg and stretch another piece of pastry over the top of the filling, crimping edges with a fork and poke vent holes in top of each pie. Brush tops with eggs. Repeat until all pastry has been used. Place on lined cooking sheets and bake until pies until they are a deep golden brown and puffed, 25-30 minutes. Cool pies to warm, about 10 minutes, or room temperature. Makes about 8 pies.


Apple and Blackberry Pie

1 recipe pastry for double-crust pie

2 pounds tart green apples (such as Granny Smith), peeled, quartered, cored, cut into
1/4-inch-thick slices
1 1/2 cups frozen unsweetened blackberries, unthawed
1/3 cup plus
2 teaspoons sugar
2 tablespoons all purpose flour

Milk
Sweetened whipping cream

1. Preheat oven to 375°F. Mix apples, blackberries, 1/3 cup sugar and flour in large bowl.
2. Roll out 1 dough disk on floured surface to 12-inch round. Transfer to 9-inch-diameter glass pie dish.
3. Spoon filling into crust. Roll out second dough disk on floured surface to 12-inch round. Place dough atop filling. Fold top crust edge under bottom edge and pinch to seal. Crimp edges decoratively. Brush crust with milk. Sprinkle with remaining 2 teaspoons sugar. Cut several slits on top of pie.
4. Bake pie until crust is golden brown and fruit is tender, covering edges of pie with aluminum foil if browning too quickly, about 55 minutes. Cool pie on rack 30 minutes. Serve pie warm with sweetened whipped cream.


Chocolate S’more Pie

For crust
1 graham cracker crumb crust, baked and cooled completely

For chocolate cream filling
7 ounces fine-quality bittersweet chocolate (not more than 70% cacao; not unsweetened), finely chopped
1 cup heavy cream
1 large egg, at room temperature for 30 minutes

For marshmallow topping
1 teaspoon unflavored gelatin (from a 1/4-ounce package)
1/2 cup cold water
3/4 cup sugar
1/4 cup light corn syrup
1/2 teaspoon vanilla
Vegetable oil for greasing

Special equipment: a candy thermometer

Make chocolate cream filling:

1. Make graham cracker crumb crust and reserve.
2. Put oven rack in middle position and preheat oven to 350°F. Put chocolate in a large bowl. Bring cream just to a boil in a 1- to 1 1/2-quart heavy saucepan, then pour hot cream over chocolate. Let stand 1 minute, then gently whisk until chocolate is melted and mixture is smooth. Gently whisk in egg and a pinch of salt until combined and pour into graham cracker crumb crust (crust will be about half full).
3. Cover edge of pie with a pie shield or foil and bake until filling is softly set and trembles slightly in center when gently shaken, about 25 minutes. Cool pie to room temperature on a rack (filling will firm as it cools), about 1 hour.

Make marshmallow topping:

1. Sprinkle gelatin over 1/4 cup cold water in a large deep heatproof bowl and let stand until softened, about 1 minute.
2. Stir together sugar, corn syrup, a pinch of salt, and remaining 1/4 cup water in cleaned 1- to 1 1/4-quart heavy saucepan. Bring to a boil over moderate heat, stirring until sugar is dissolved, then boil until thermometer registers 260°F, about 6 minutes.
3. Begin beating water and gelatin mixture with an electric mixer at medium speed, then carefully pour in hot syrup in a slow stream, beating (avoid beaters and side of bowl). When all of syrup is added, increase speed to high and continue beating until mixture is tripled in volume and very thick, about 5 minutes. Add vanilla and beat until combined, then immediately spoon topping onto center of pie filling; it will slowly spread to cover top of pie. Chill, uncovered, 1 hour, then cover loosely with lightly oiled plastic wrap (oiled side down) and chill 3 hours more.
Brown topping:
1. 
Preheat broiler.
2. Transfer pie to a baking sheet. Cover edge of pie with pie shield or foil and broil 3 to 4 inches from heat, rotating pie as necessary, until marshmallow topping is golden brown, about 3 minutes. Cool pie on a rack 10 minutes. Slice pie with a large heavy knife dipped in hot water and then dried with a towel before cutting each slice.


Gingery Apple Crumb Pie

1 uncooked piecrust, fitted into a 9-inch pie plate
1/2 cup cup cold unsalted butter (1 stick), cut into small pieces
3/4 cup plus 1 tablespoon all-purpose flour, spooned and leveled
3/4 cup granulated sugar
2 1/2 pounds apples (about 5; such as Granny Smith, Braeburn, or Empire), peeled and thinly sliced
1 tablespoon grated fresh ginger
1/4 teaspoon ground cinnamon
1/4 teaspoon kosher salt

1. Set an oven rack in the lowest position and heat oven to 375ยบ F. Place the pie plate on a foil-lined baking sheet.
2. In a food processor, pulse the butter, ¾ cup of the flour, and ¼ cup of the sugar until large clumps form. Transfer to a bowl and refrigerate until ready to use.
3. In a large bowl, toss the apples, ginger, cinnamon, salt, and the remaining ½ cup of sugar and tablespoon of flour.
4. Transfer the apple mixture to the crust, sprinkle with the crumb topping, and bake until the top is golden and the apples are tender, 55 to 60 minutes. Serve warm or at room temperature.

Sunday, October 31, 2010

Garlic-Roasted Cauliflower!!!!!


HOLY SMOKES!!!! I have NEVER, EVER had such delicious cauliflower!!! This is simply divine...even kids who "hate" vegetables will love it! The lemon is a burst of happiness in your mouth along with the utter genius of roasted garlic! This is great for a casual evening at home or a fabulous garden party! I served mine with brown rice and Dover sole. Simply delicious!!!!

Garlic-Roasted Cauliflower

1 head garlic, cloves separated but not peeled
1 large head cauliflower, trimmed and cut into large florets
4 1/2 tbsp olive oil
2 1/2 tsp kosher salt
1 tsp ground black pepper
1/4 c. chopped flat-leaf parsley
3 tbsp pine nuts
2 tbsp fresh lemon juice

1. Heat oven to 450F. Bring a small pot of water to a boil and add the garlic cloves. Boil for 15 sec; drain and peel. Cut the largest cloves in half lengthwise.
2. On a rimmed baking sheet, toss the cauliflower with the garlic, 3 tbsp olive oil, 2 tsp salt and black pepper. Spread into a single layer and roast, stirring twice, until the cauliflower is tender and the garlic is lightly browned, 20-25 minutes.
3. Transfer the cauliflower to a large bowl with the garlic and pan juices. Add the remaining 1 1/2 tbsp olive oil, parsley, pine nuts and lemon juice. Sprinkle with 1/2 tsp salt, toss well and serve hot or warm.

Serves 6

Thursday, October 28, 2010

A Frothy Orange Drink


I am, once again, using my wonderful juicer and today I made a a delicious frothy beverage! It is full of goodness and delicious flavor...but no oranges! Here's the recipe...and if you don't have a juicer...you should go get one today!

Frothy Orange Drink

2 granny smith apples
1 lemon, skin removed
1/2 English cucumber
2 stalks celery
2 carrots
1/4 green cabbage
2 golden beets, tops removes & scrubbed thoroughly
2 kale leaves

Run everything through your juicer! Drink up!

Makes about 24 oz.

Saturday, September 25, 2010

A Very Special Brunch: German Apple Pancake


The side poof!!!!


The grand finale!!!


Last night my lovely friend Anne stayed over at my place. This morning was spent in her cheerful company, chatting and laughing in our pajamas like we were a couple of tween girls! Nothing beats girlfriend time!!!!


The Lovely Anne

To make our morning complete, and because we were too lazy to put on clothes to go out to eat, we decided to cook something delicious...a HUGE German Apple Pancake was the result! Invite some friends over and whip this gorgeous dish up!!!

German Apple Pancake, from The Great Big Butter Cookbook

4 tbsp. butter
3 large (1 1/2 pounds total) Granny Smith apples, peeled, cored, and sliced into 1/4" thick slices
1/4 c. dark brown, packed
1/2 tsp. nutmeg, fresh ground
1 tsp. cinnamon
6 large eggs, room temperature
1 1/2 c. buttermilk, at room temp
1 c. all-purpose flour
1/4 c. granulated sugar
1 tsp. vanilla
1/2 tsp. salt
Confectioner's sugar, for garnish

Preheat oven to 375F.

Place the butter in a 9x13x2 glass backing pan and melt in the oven. Arrange the apple slices over the melted butter and return to the oven, baking until apples are soft, about 10 min.

In a small bowl, combine the brown sugar, nutmeg and 1/2 tsp. cinnamon. Remove the pan from the oven and sprinkle the apples with the brown sugar mixture; set aside.

In a medium mixing bowl, combine the eggs, buttermilk, flour, sugar, vanilla, salt and remaining 1/2 tsp. cinnamon. Mix with an electric mixer for 1 1/2 minutes. Pour over the apples.

Return the pan to the oven and bake for 35 minutes or until the top is golden brown and the apples rise to the surface. Remove from the oven, sprinkle with confectioner's sugar, and serve immediately.

The recipe says it serves 12...right! Try more like 4!!!! Enjoy!!!!

*Anne had a great idea!!! Crumble thick sliced maple bacon on top!!! TOOOOOOOOO delicious!!!!

Thursday, September 23, 2010

Pre-Holiday Feast: Corn Casserole


My fabulous friends, the Conradts, are hosting a Thanksgiving dinner tonight and I got invited!!!! To contribute to the meal I'm bringing one of my favorite dishes from the mid-west...Corn Casserole. My first introduction to this dish happened in northern Illinois on a snowy Thanksgiving afternoon. My first college roommate, Lisa, invited me to her house for the holiday and I was ready to see what would be on the table. In one dish there was this weird yellowish, pudding like substance and I was a little bit grossed out...my mom was pretty hard core with fresh ingredients and casseroles were not part of my regular food intake. I asked what it was and Lisa explained that it was her gramma's corn casserole. They HAD to have it every year...it just wasn't Thanksgiving without it. I figured that I should try it if I was really going to experience Thanksgiving in Illinois and I was super happy that I did!!!! The casserole was sweet and savory and comforting all at the same time. The butter & cheese made it the perfect holiday dish! Go mid-west farmers!!!

Below you'll find the best recipe that I've found for Corn Casserole. It's from Paula Deen...the Duchess of Butter...and it is simply fantastic! Happy holidays!!!

Corn Casserole

1 (15 1/4-ounce) can whole kernel corn, drained
1 (14 3/4-ounce) can cream-style corn
1 (8-ounce) package corn muffin mix (recommended: Jiffy)
1 cup sour cream
1/2 cup (1 stick) butter, melted
1 to 1 1/2 cups shredded extra sharp Cheddar

Directions:
Preheat oven to 350 degrees F.

In a large bowl, stir together the 2 cans of corn, corn muffin mix, sour cream, and melted butter. Pour into a greased 9 by 13-inch casserole dish. Bake for 45 minutes, or until golden brown. Remove from oven and top with Cheddar. Return to oven for 5 to 10 minutes, or until cheese is melted. Let stand for at least 5 minutes and then serve warm.

Side note: I have noticed that this works better in a smaller "9x13" so if you have one, go for it!

Thursday, September 9, 2010

Mama Erin's World Famous Roasted Chicken

The buttery goodness:


After the roasting:


I love roasted chicken!!! It is a comfort food that is super easy to make and really delicious! Every time I make it for guests they swoon and want to know my secrets. There are two key things to making a really juicy roasted chicken: a HOT oven & butter! Here's how I whip up this tasty dish:

Roasted Chicken

1 5-6 lb. chicken
1 lemon, cut into wedges
1/2 onion, cut into wedges
a handful of flat leaf parsley
Salt & pepper
Old Bay seasoning
4-8 tbsp. butter

Heat oven to 425F. Prepare a roasting pan by lining it with aluminum foil (this just makes clean-up easier!) Rinse off your chicken, remove giblets & neck and then pat dry with paper towels. Salt & pepper in cavity and then stuff it with lemons, onion and parsley. Salt & pepper outside of bird & sprinkle with Old Bay, making sure to season the bottom of the bird as well. Place chicken in the roasting pan with breast side up. Put pats of butter in random spots all over the bird. Slide her into the oven!

Baste the bird with the melted butter every 20 minutes or so and roast until the bird is fully cooked 60-75 minutes. The skin should be a dark caramel color and juices from the leg joint should run clear.

Let rest for 5 minutes and then carve and devour!

Wednesday, September 1, 2010

Say it with me now...Chowder!!!


The other day I nearly fainted at the beautiful salmon that they had at Safeway! I typically don't get excited about the fish at Safeway but it was GORGEOUS! I got two lovely "filets" and was happily on my way. I realized that I had too much fish for just me unless I was creative and made something that reheated well (I can't handle reheated fish...it grosses me out.) What I came up with was Salmon Chowder!!!! It was easy and ever so delicious! So delicious that it didn't matter that it was 90F outside! I also made some drop biscuits to go along with it but you can whip up the Baking Powder Biscuits that I posted a while back.

Salmon Chowder

1/2 lb. red potatoes, cut into 1/2 inch cubes
1/2 lb. thick sliced bacon, cut crosswise into 1/4 inch-wide strips
2 c. chopped scallions (2 bunches)
1 c. fresh or frozen corn
1 tbsp. finely chopped garlic (3 cloves)
1 tsp. finely chopped fresh thyme
1 bay leaf
1/8 tsp. red-pepper flakes
3 c. whole milk
2/3 heavy whipping cream
2 lb. of salmon filets, bones, skinned and cut into one inch cubes
1/2 tsp. salt
1/4 tsp. black pepper

Cook potatoes in a 1- to 1 1/2- quart heavy saucepan of boiling salted water until just tender, about 8-10 min. Drain and set aside.

Cook bacon in a 5-quart heavy pot over moderate heat, stirring occasionally, until crisp, about 8 minutes. Add scallions, corn, garlic, thyme, bay leaf, and red-pepper flakes and cook over a moderately low heat, stirring occasionally, until scallions are tender, about 5 minutes. Add milk and cream and bring just to a boil. Reduce heat to moderately low, then add potatoes, salmon, salt and pepper and cook, gently stirring occasionally, until salmon is just cooked through and begins to break up as you stir, 5-8 minutes. Discard bay leaf before serving.

*Note: If there is an excess of bacon fat feel free to drain some of it off but it is needed for flavor so don't do away with it completely! You can also add a squirt of lemon juice if you like.

Saturday, August 28, 2010

Grilled Swordfish with Pesto & Rice


I have this friend named Hannah. She is energetic, funny, wicked smart, and totally stylish. She's also 12 and she thinks I am pretty darn cool. It makes me feel awesome to be loved by this sweet girl and one of the things that she loves best in the world, other than me, is fish...believe it or not! She wants to try every new kind of seafood that she can find and she's always up for a food adventure. One day, while shopping at Trader Joe's, Hannah "talked me into" buying swordfish so that I could cook for her and feed her. I had NO IDEA how to cook swordfish but I'm always up for a cooking adventure (especially when it means an extra happy kiddo), so off I went to the land of fish recipes to figure out what to do with it. The answer was...grill it! This afternoon we whipped up a tasty lunch. Here's what we ate:

Grilled Swordfish with Pesto & Rice

For the rice:
Just make some rice...nothing fancy :)

For the pesto:
1 box of basil from TJ's
1/4 c. grated parmesan cheese
1/4 pine nuts (I also like walnuts so you can substitute!)
4 cloves fresh garlic, peeled and smashed
~1/2 c. olive oil
salt & pepper to taste

Put basil, cheese, nuts and garlic into a food processor. With processor running, drizzle in olive oil until the sauce has a good texture, less for a thicker sauce...more for a thinner sauce. Taste your pesto. Add salt & pepper or more cheese or more garlic...whatever you like!

For the fish:
2-4 one inch thick swordfish steaks (they come in two packs in the freezer section at TJ's)
olive oil
salt & pepper

Heat the grill. Rub the fish with oil & season with salt and pepper. Once the grill is hot, throw the fish on there. Let it cook 5 minutes on each side. Bring it inside and eat!

I plated this trio as follows: rice on the plate, fish on top of rice, spoonfuls of pesto running over rice & fish.


The fish was delicious and I am totally converted to swordfish! Even the crispy skin was good!!! And...Miss Hannah loved it! I got the full mouth nod with a goofy smile!!! Oh how I love happy kids!!!

Saturday, August 14, 2010

As Requested....Stuffed Zucchini


So I have a fabulous garden this year! I have already written a couple of posts about it, so you all know what I'm talking about! Between my landlady and myself we check on the garden every other day to pick what is ripe and make sure that we don't end up with the world's largest squash. Well...somehow we missed a zucchini...for a long time and ended up with a 16 inch long boat! What does one do with a 16 in long zucchini? Stuff it! I used an online recipe for rice stuffing and added some of my own flavors to it...so feel free to be creative! I was thinking of adding some chevre to it next time! Here's how I made some tasty stuffed squash!

Stuffed Zucchini


1- 16 inch long zucchini (or you could do several regular size zucchini), cut in half with seeds removed

Filling:
4 c. cooked brown rice
4 slices of bacon, cooked and crumbled
1 medium onion, diced
1/2 c. sun-dried tomatoes, dry packed, julienne style
1- 15oz. can mushrooms with juice (do not drain!)
2 tsp. chopped fresh thyme
2 tbsp. chopped fresh parsley
1 bay leaf
salt & pepper to taste

Cook your bacon. Remove the bacon to drain and cook onions in the bacon fat until translucent. Add the fresh herbs and bay leaf and stir for 1 minute. Turn off the heat. Add the entire can of mushrooms (I used the sliced ones), sun-dried tomatoes and crumbled bacon. Stir.
In a large bowl, combine the rice and bacon mixture. Salt and pepper to taste. Make sure the rice is moist! Add water or chicken broth if it's too dry.
Heat the oven to 350 or 375 depending on the size of your squash. Place the zucchini on a foil covered baking sheet. Sprinkle with salt & pepper and a little bit of olive oil. Spoon the stuffing into the hollow of the squash until a nice mound forms. Cover with foil and bake for 20min. Remove foil and continue baking until squash is soft, 20-30min more.

Serves 6-8

If you are in need of zucchini and live in the Bay Area...give me a call!!!!

Saturday, July 31, 2010

Quinoa Salad with Chicken and Mixed Greens


I recently completed a cleanse. The program that I did had these amazing recipes in the back of the book and today I am sharing my FAVORITE with you!!!! I like it best with the Organic Red Quinoa from Trader Joe's but regular quinoa works as well. This salad is fresh and light but surprisingly filling and satisfying! Enjoy!!!

Quinoa Salad with Chicken and Mixed Greens
Serves 2

2 cups cooked quinoa
2- 4 oz. chicken breasts, roasted & sliced
1/4 c. currants
1/4 c. chopped almonds
1/2 c. diced carrots
1/4 c. chopped mint
1/4 c. scallions, cut thinly
1/4 c. chopped parsley
1/4 c. fresh lime juice
1 tsp. agave syrup
1/2 tsp ground cumin
1 tsp. sea salt
1/2 c. olive oil
4 cups salad greens

1. Put all ingredients except chicken and salad greens in a bowl, and toss together with quinoa, adjust seasoning to taste.
2. Make a bed with half of the greens on a plate, mound half of the quinoa mix on top and then top with half of the chicken.
3. Eat!!!!

Want to know what in the heck quinoa is? Here you go: http://en.wikipedia.org/wiki/Quinoa

Tuesday, July 13, 2010

Olive Oil Bread


On Sunday night I "needed" hamburger buns for the turkey burgers I was making. I had nothing in the house that resembled bread so I broke out my Martha Stewart's Baking Handbook and cracked open the yeast bread section. Eureka! The recipe for the Olive Oil Bread sounded perfect and fairly simple as far as yeast breads go. The results were these unbelievably dreamy rolls...spongy and perfectly yeasty with a slightly crusty crunch on the outside. I made four rolls but they were HUGE! I'd recommend making eight to have the perfect sized bun for your burgers!

Olive Oil Bread or Burger Buns

4 1/2 c. all-purpose flour
2 pkg. dry yeast
2 c. water, warm but not hot
3/4 c. good quality olive oil
1 tbsp. coarse salt
Cornmeal for dusting baking sheet

In the bowl of an electric mixer, combine the flour, yeast, water and olive oil; stir with a wooden spoon until all ingredients are incorporated. Cover with plastic wrap and let rise until double in bulk, 1 hour to 1 hour 15 minutes.

Attach the bowl to the mixer fitted with the bread hook. Add the salt,and mix to combine on a low speed. Raise the speed to medium and beat until the dough pulls away from the sides of the bowl but is still sticky, about 3 minutes.

Turn out the dough onto a lightly floured work surface. Knead it for 1 minute, then transfer to a large, lightly oiled bowl. Cover with plastic wrap. Lt rise until doubled in bulk, about 1 hour.

Preheat oven to 450F. Return the dough to a lightly floured work surface. Fold in the dough by folding the bottom third up, the top third down, the right and left sides into the middle. If making rolls, divide into 8 equal pieces. Shape into rounds. Place on a greased & cornmealed baking sheet. Allow to rest until it is slightly puffed, about 30 minutes.

With a sharp knife or razor, make four slashes on the top of each roll/loaf to form a square. Bake until the crust is golden brown, about 35 minutes for 1 loaf or about 25 minutes for rolls.

Wednesday, July 7, 2010

Banana-Nut Bread


Last night I baked the best banana bread I have ever made! Luckily, I was able to control myself and eat only one muffin, but it was definitely a struggle! Go get some bananas because you are gonna want to whip this up!

Banana-Nut Bread

3 c. all-purpose flour
1 tsp. baking soda
3/4 tsp. salt
3 large eggs
2 c. sugar
1 1/3 c. vegetable oil
2 tbsp. vanilla extract (YES! Tablespoons!)
1 1/2 c. mashed, ripe bananas (about 3 medium)
1 c. shredded coconut
1 c. chopped hazelnuts (you could use pecans or walnuts)
1/2 c. buttermilk (I used whole milk and 1 tsp. cider vinegar)

Preheat the oven to 350F. Coat two 9-by-5-inch loaf pans with butter or cooking spray; set aside. In a large bowl, whisk together the flour, baking soda, and salt; set aside.

In the bowl of an electric mixer fitted with the paddle attachment, beat the eggs, sugar, and vegetable oil on medium-low speed until combined. Beat in the flour mixture. Add the vanilla, banana, coconut, nuts and buttermilk, and beat just to combine.

Divide batter evenly between prepared pans. Bake until a cake tester inserted in the center comes out clean, 60-65 minutes. Transfer to a wire rack to cool for 10 minutes. Remove loaves from pans and let cool completely...if you can wait that long!

Next Martha recipe...Fennel and Golden-Raisin Scones! YUM!

Friday, July 2, 2010

Chocolate-Pecan Gelato


The gelato is at last basking in the freezer in all of its glory! Here is the glorious recipe...be ready to make an utter disaster out of your kitchen!

Chocolate-Pecan Gelato (adapted from Williams-Sonoma Ice Cream cookbook)
Makes about 1 qt. (I quadrupled the recipe and added time to the cooking and it turned out great!)

Pecan Paste:


3/4 c. raw pecans, you can roast them if you want a bolder nut flavor
1 tbsp. canola oil
1 tbsp sugar
Pinch of salt

Custard:

Nut paste
3 c. whole milk
4 large egg yolks
1/2 c. heavy cream
3/4 c. sugar
Pinch of salt
4.5 oz. bittersweet chocolate, coarsely chopped

Make the pecan paste by combining the nuts, oil, sugar and salt in a food processor. Process until a thick paste forms, about 2 minutes. You should have about 1/3 c. of paste.

In a heavy 2-qt. saucepan, combine the milk and nut paste. Cook over medium heat until bubbles form around the edge of the pan, about 5 minutes. Do not let the mixture boil.

Meanwhile, combine the egg yolks, cream, sugar, and salt in a bowl. Whisk until smooth and the sugar begins to dissolve. Remove the milk mixture from the heat. Gradually whisk about 1/2 cup of the hot milk mixture into the egg mixture until smooth. Pour the egg mixture into the saucepan. Cook over medium heat, stirring constantly with a wooden spoon and keeping the custard at a low simmer, until it is thick enough to coat the back of the spoon and leaves a clear trail when a finger is drawn through it, 4-6 minutes. Do not let the custard boil.

Put the chopped chocolate in heatproof bowl and pour the hot custard over it. Stir until smooth. Strain through a fine-mesh sieve into a bowl. Place the bowl in a larger bowl partially filled with ice cubes and water. Stir occasionally until cool. Cover with plastic wrap, pressing it directly on the surface of the custard. Refrigerate until chilled, at least 3 hours or up to 24 hours.

Pour the custard into an ice-cream maker and freeze according to the manufacturer's instructions. Transfer the gelato to a freezer-safe container. Cover and freeze until firm, at least 4 hours or up to 3 days, before serving.

Thursday, July 1, 2010

Muffin Report & My Secret Love Affair


Recipe #2 has been made and "tested"! The cranberry-zucchini muffins are divine! They are super easy to mix up and they are that perfect balance of healthy and dessert! My only dilemma was trying to find cranberries at this time of year. Luckily, the lovely Kaija had some frozen so I was saved! I think that I'm going to try them with dried cranberries or even dried blueberries. The pockets of hot berry burned my little mouth!

And now for my secret love affair...

Ok ladies and gentlemen. I have a confession to make. I am a dyed in the wool butter fan. I hate all things "fake"...meaning anything manufactured or created in a lab. This especially applies to my baking supplies. I have been known to use upwards of 10 pounds of butter for a single Thanksgiving meal. I am pretty hardcore! I recently purchased some cooking spray with flour (gasp, shock, horror!) in order to make it easier to grease the foil that I put my homemade marshmallows on. It is GENIUS! Every single nook and cranny was covered and the marshmallows were still delicious! So last night I wanted to roast some chicken on lemon slices but I didn't want everything to stick...so I busted out my cooking spray and coated the pan. Once again, GENIUS! Even the caramelized lemon juice came off the pan as if it were butter! So, I am here to say that I am newly in love with cooking spray. Please don't think less of me ;)

My chicken was a dream come true and super easy to make! I paired it with some sauteed zucchini with garlic. Here's the recipe for you to try out:

Lemon Baked Chicken


1 Meyer lemon
2 chicken breasts (leave the skin on for baking...it'll be juicier!)
Montreal Chicken seasoning
Old Bay Seasoning
Salt & Pepper to taste
Cooking Spray w/Flour

Heat oven to 350F. Spray your favorite casserole dish with cooking spray w/flour. Slice the Meyer lemon and lay slices on the bottom of the dish.

Sprinkle seasonings over the chicken breasts and rub in (use the Montreal Chicken seasoning most liberally.) Lay the chicken on top of the lemon slices. Bake for 30-40 minutes or until chicken is cooked through.

Serves 2.

I am off to the store to get supplies for the ice cream for the 4th! I can't wait!!!!

Thursday, June 24, 2010

Growing Things


I have always loved growing things. When I was little my mom showed me how to take the leaves of this one particular plant, pin it to the curtain and watch it grow. Once the magical leaf had enough roots we would plant it in cool, dark, rich soil. Every year the two of us would plan out a garden, plotting "partner" plots where the plants actually nourished each other as well as pest deterrent planting. I still have one of the gorgeous pieces of graph paper with our annual plan all in color and it always makes me think fondly of all of those years of gardens. This year it is my turn to plan and grow a backyard garden. We have peppers, green beans, peas, watermelon, cantaloupe, tomatoes, zucchini, cucumber and pumpkins! It is GORGEOUS! It is so thrilling to watch as the plants go from seeds to leaves to fruit! I've pictured one of my little watermelons that is growing bigger every day. The finished product will weigh 20-25 pounds and is supposed to have crimson red flesh inside of its mottled green skin. I love watching everything grow!

My garden is not the only thing growing in my life! I recently began an earnest search for spiritual guidance focusing mainly on the area of marriage or rather the lack thereof. I wanted to know what I needed to do to prepare myself for marriage and to be open to that kind of love. I started it with a monthly scripture study topic and a journal just for scripture study. The next thing I did was look at what kind of counsel I have received about it and was hit in the head by the fact that I had completely ignored counsel from my Bishop to go to the temple to look for a good man. Over the past month I have been going to the temple once a week and have found great blessings and guidance there. On Monday I received a letter from the temple Presidency letting me know that I had been recommended by my Bishop and Stake President to be an ordinance worker at the Oakland Temple. I was thrilled! Today I had my interview with a member of the temple Presidency that proved this calling to be divinely planned. Here's what happened:

President Harwood and his wife and I all introduced ourselves. As soon as we sat down Sister Harwood asked me what I did for work. I replied that I am a freelance American Sign Language interpreter. Her eyes immediately filled with tears. She explained that she had just been on the phone with Sister Hunter (the temple President's wife) talking about how much they need an ordinance worker who is fluent in ASL. My eyes immediately filled with tears. This was definitely not an accident!

I am thrilled to report that I will be serving as an ordinance worker every Friday from 6am-12pm starting on July 30! I will also be serving one Saturday a month when the Deaf branch from Fremont comes to the temple. I will be training other temple workers on the language of the temple in ASL as well as being the designated person to be with the brides that need ASL. Really? Me?! I am so excited I could burst!!!!

This latest experience, in a whole string of amazing spiritual growth, is one more burst of color in my personal growth garden. Sometimes the idea of growing is daunting but I am encouraged daily that this growth is leading me to my ultimate goal of a family sealed together through temple ordinances.

Growing is a wonderful thing!

Wednesday, June 23, 2010

First Fruits!


The first fruits of any kind of work always makes me joyful! Today I picked the first peas off of my fabulous little pea plants! They were sweet and delicious! Oh first fruits! I am also greatly anticipating my watermelon! The little guys are about 1.5 inches long now and are bursting out all over the place. They are so adorable it's ridiculous! I am wondering if I'm going to be able to keep up with the prolific nature of my plants! I think that there may be a melon party come August!

The zucchini is completely out of control so my next baking extravaganza will be the recipe from page 37 from Martha's Baking Handbook for Cranberry-Zucchini Muffins! Here's the recipe for the muffins:

Cranberry-Zucchini Muffins


1 3/4 c. all-purpose flour
1/2 tsp baking powder
1/2 tsp baking soda
1/2 tsp ground cinnamon
1/4 tsp salt
2 large eggs
1 c. sugar
1/2 c. vegetable oil
1/2 tsp vanilla extract
1 c. finely grated zucchini (1-2 medium)
1/2 c. frozen or fresh whole cranberries

Preheat the oven to 375F. Generously butter 10 cups of a standard 12-cup muffin pan; set aside. In a medium bowl, whisk together the flour, baking powder, baking soda, cinnamon, and salt; set aside.

In a large bowl, whisk together the eggs, sugar, oil, and vanilla. Stir in the zucchini. Add the flour mixture, and stir to combine; do not overmix. Using a rubber spatula, fold in the cranberries. Divide the batter evenly among the 10 prepared muffin cups.

Bake, rotating the pan halfway through, until the muffins are golden and a cake tester inserted in the center of one muffin comes out clean, 25-30 minutes. Transfer pan to a wire rack to cool for 10 minutes. Turn the muffins on their sides in their cups, and cool. Serve warm or at room temperature.

So far my baking adventures have been totally successful! The baking powder biscuits were delicious! Flaky, buttery and creamy all in one! I even got great reviews from the lovely recipients! Hmmm...now I have to figure out who gets the muffins!!! Anyone? Anyone?

Tuesday, June 15, 2010

Oh Martha!


I have recently been the recipient of a lovely gift...two quintessential Martha Stewart cookbooks. I am now the proud owner of seven cookbooks by the ever exacting Martha! The five that I already owned have been used for various occasions from Christmas dinner to catering a party for my brother's film premier in LA. I have even copied Christmas carols out of one! I adore the gorgeous glossy photos and the precise recipes. With the new additions to my cookbook library I am moved to make some sort of goal for the year that includes a great deal of cooking from both the Baking Handbook and Martha Stewart's Cooking School.

The Baking Handbook has six chapters of goodness! We have: Simple Baked Goods; Cookies; Cakes; Pies, Tarts, Cobblers, and Crisps; Yeasted Baked Goods; and Pastries! It looks like the easiest thing to do is to start at the very beginning with the basics. There are 26 different quick bread recipes and 6 months left in the year. It looks like I'll be baking up some tasty goodness once a week , plus a little every once in a while, so that I can finish chapter 1 by the end of the year! This week I'll be whipping up some Baking Powder Biscuits and sharing them with some lucky friend! I'll keep you posted on the successes and failures and I'll naturally be sharing the great recipes with you! If you're wondering, "What about the Festival of Pies?!" have no fear! I'll break out a couple of her pie recipes in November to share with all of the FOP attendees!

As for the Cooking School...well...it looks like it'll make for a good summer read as I lounge in the sun sipping mint tea (my latest addiction). I know that I can gain loads of technique tips from actually reading the introduction! I am ubber reliable for not reading the introduction or all of the directions! It's definitely gotten me into trouble a few times!!!! When fall comes (oh, please come soon) I'll start cranking out the soups and stocks and maybe even pairing them with some quick breads...this is starting to sound delicious!


What about you? Do you have any favorite Martha recipes? Or books? Or tips? Please share!!!!

(Please forgive the misuse of any : or ; I really just used them to keep everything organized properly...in my mind anyway!)

Monday, June 14, 2010

Book Club Pavlova

Have you ever seen a pavlova? It is a glorious sight!!!! The crisp white meringue dripping with glorious berries and sugary syrup would make the best of us swoon. Pavlova has been one of those elusive dishes for me. I have gazed at it in the pages of many a cookbook and nearly drooled to death when watching Barefoot Contessa whip up this delicious treat. To date, I haven't had a reason to make one. It also doesn't contain chocolate and must be eaten immediately so I was hesitant to put in the time to make it happen. This month I hosted our wonderful Book Club and had the perfect excuse to make this light and scrumptious summery dessert. Let me just tell you now, it is worth all of the effort!!! Who needs chocolate when you have a lovely pavlova?!

Mixed Berry Pavlova
, Barefoot Contessa at Home
Serves 6

* 4 extra-large egg whites, at room temperature
* Pinch kosher salt
* 1 cup sugar
* 2 teaspoons cornstarch
* 1 teaspoon white wine vinegar
* 1/2 teaspoon pure vanilla extract
* Sweetened Whipped Cream, recipe follows
* 1/2 pint fresh strawberries, hulled and sliced
* 1/2 pint fresh blueberries
* 1/2 pint fresh raspberries
* Triple Raspberry Sauce, recipe follows

Directions

Preheat the oven to 180 degrees F.

Place a sheet of parchment paper on a sheet pan. Draw a 9-inch circle on the paper, using a 9-inch plate as a guide, then turn the paper over so the circle is on the reverse side. (This way you won't get a pencil mark on the meringue.)

Place the egg whites and salt in the bowl of an electric mixer fitted with a whisk attachment. Beat the egg whites on high speed until firm, about 1 minute. With the mixer still on high, slowly add the sugar and beat until it makes firm, shiny peaks, about 2 minutes.

Remove the bowl from the mixer, sift the cornstarch onto the beaten egg whites, add the vinegar and vanilla, and fold in lightly with a rubber spatula. Pile the meringue into the middle of the circle on the parchment paper and smooth it within the circle, making a rough disk. Bake for 1 1/2 hours. Turn off the oven, keep the door closed, and allow the meringue to cool completely in the oven, about 1 hour. It will be crisp on the outside and soft on the inside.

Invert the meringue disk onto a plate and spread the top completely with sweetened whipped cream. Combine the strawberries, blueberries and raspberries in a bowl and toss with about 1/2 cup of raspberry sauce, or enough to coat the berries lightly. Spoon the berries carefully into the middle of the Pavlova, leaving a border of cream and meringue. Serve immediately in large scoops with extra raspberry sauce.

Sweetened Whipped Cream:

* 1 cup cold heavy cream
* 1 tablespoon sugar
* 1 teaspoon pure vanilla extract

Whip the cream in the bowl of an electric mixer fitted with a whisk attachment (you can also use a hand mixer). When it starts to thicken, add the sugar and vanilla and continue to beat until firm. Don't overbeat!

Yield: 1 cup

Triple Raspberry Sauce:

* 1 half-pint fresh raspberries
* 1/2 cup sugar
* 1 cup seedless raspberry jam (12-ounce jar)
* 1 tablespoon framboise liqueur

Place the raspberries, sugar and 1/4 cup water in a small saucepan. Bring to a boil, lower the heat, and simmer for 4 minutes. Pour the cooked raspberries, the jam, and framboise into the bowl of a food processor fitted with a steel blade and process until smooth. Chill.

Yield: 2 cups

Happy summer!!!!

Monday, June 7, 2010

Brown-Butter Butterscotch & Chocolate Chip Blondies

As of late I have been subbing for a really fabulous Sunday School class of 9 year-old girls! Every week I sub they want some kind of fabulous treat...and who am I to deny them baked goods? I've brought them everything from Easter candy bags to s'mores (with homemade marshmallows) to Maple Glazed Oatmeal Cookies! This past Sunday I wanted to bring them some kind of bar cookie (and it actually related to the lesson!) After searching through my Martha Stewart Cookies cookbook I came up with a combination Martha/Erin recipe that is not just delicious but worth breaking your diet for!!!

Brown-Butter Butterscotch & Chocolate Chip Blondies

2 1/2 sticks of butter, plus more for pan
2 1/4 c. all purpose flour, plus more for pan
1 1/2 tsp. baking powder
1 tsp. salt
2 c. packed dark brown sugar
1/2 c. granulated sugar
3 large eggs
2 1/2 tsp. vanilla extract
1 c. butterscotch chips
1 c. semi-sweet chocolate chips

1. Preheat oven to 350F. Butter a 9 x 13 pan. Line bottom of the pan with parchment paper; butter and flour parchment.

2. In a saucepan, over medium heat, cook the butter until it turns golden brown; remove from heat and let cool. Whisk together flour, baking powder & salt.

3. In the bowl of an electric mixer, combine brown butter and both sugars; stir with a wooden spoon until combined. Add eggs. Using the paddle attachment, beat on medium-high speed until light and fluffy (about 3 min). Add the vanilla, and beat to combine. Add the flour mixture, mix until combined. Stir in both chips until thoroughly combined and pour into the prepared pan.

4. Bake until a cake tester inserted in the center comes out clean, 35-40 minutes (do not over bake). Allow to cool completely (I waited overnight) before turning out of pan onto a cutting board. Peel off parchment paper; cut blondies into cool shapes or just into bite-sized pieces! Store in an airtight container up to 3 days.

Happy baking!!!!

Thursday, May 27, 2010

BBQ Season!

WAHOO!!! It's time to fire up the grill and bust out your roasting skewers! It's officially BBQ season! I'm kicking it off with a little dinner party tomorrow night and can't wait to feed all of the fun folks coming over! I am so excited that I am actually using our built-in, brick, charcoal powered bbq to really make it count!

Here's what's on the menu:

1. Kentucky Smoked Baby Back Ribs
2. Citrus-Mustard Grilled Chicken
3. Brown Rice Pasta Salad
4. Dilled White Bean and Grape Tomato Salad
5. Grilled Corn on the Cob
6. S'mores...with homemade marshmallows of course!

Want the recipes? Well...tell me when your first grilling event is and what you're grilling up and I'll share my secrets with you!

Coming up next....homemade ice cream!!! Despite all the rain...I can smell summer coming!

Thursday, April 15, 2010

Lady Marmalade!

Oh watch out ladies and gentlemen!!! Many of you know but just in case you haven't heard yet...I am a vendor at a fantastic underground farmers market!!!! Tomorrow (Friday) is the big day and I am getting all of my ducks in a row...85 half pint jars of marmalade, signs made, table cloth purchased, labels are tied on and the table and dolly are in the car! I am excited, scared, excited....nervous...and excited! Here is a little preview for all of you!


If you are in the neighborhood come on by my stall at the forageSF underground market (http://www.foragesf.com for more info and to sign the guest list)

Oh...and I was invited (by special invitation) to be a vendor at a second underground market!!! So..if you can't make it this Friday come on down on May 1 to the Local Flavor underground market! http://www.LocalFlavorSF.org

Sunday, April 4, 2010

Souffle Success!

Tonight I made my very first souffle...EVER! I had this idea that a souffle was near to impossible to make. All of those souffles in movies and on tv deflating the instant a slight motion occurred gave me the wrong idea. It's all a lie! Break out your casserole dishes and whip up a souffle...the only hard part is washing the dishes afterwards!

Spinach and Gruyere Souffle (from Everyday Food, issue 68)

2 tbps. unslated butter, room temperature, plus more for the baking dish
1/3 c. plain dried breadcrumbs
5 c. (5 oz.) packed spinach, trimmed and washed
2 tbsp. all-purpose flour
3/4 c. plus 2 tbsp whole milk
1/2 c. grated gruyere cheese
salt & pepper
2 large eggs separated, plus 2 large egg whites

1. Preheat oven to 375F. Butter a round 1-quart tall-sided baking dish and dust with breadcrumbs; set aside. In a large skillet, heat 2 tbsp water over medium-high. Add spinach and cook, stirring constantly, until wilted, about 4 minutes. Transfer to a strainer to cool; press to release liquid.
2. In a medium saucepan, melt butter over medium until bubbling. Add flour and whisk until a paste forms. Continue to cook until pale blond in color, 2-3 minutes. Whisking, gradually add milk. Cook, whisking, until lumps are gone and mixture is thickened, 3-5 minutes. Remove from heat. Stir in cheese until melted; season with salt and pepper. Transfer souffle base to a large bowl.
3. In a food processor, pulse spinach and egg yolks until coarsely pureed. Add 1/4 c. souffle base; pulse until blended. Stir spinach mixture into remaining souffle base.
4. In a large bowl, using an electric mixer, beat 4 egg whites and a pinch of salt on medium-high until stiff peaks form (do not overbeat), about 3 minutes. In 2 additions, gently fold egg whites into souffle base. Pour batter into prepared dish and bake until souffle is tall, browned and firm to the touch, about 35 minutes. (Avoid opening the oven during the first 25 minutes of baking.) Serve immediately.

Serves 8 (at least that's what the magazine says)
Prep time: 25 min
Total time: 1 hr

Wednesday, March 31, 2010

Pot Roast Bonanza!

Holy Smokes!!!! I can hardly believe the amazing aroma wafting out of my crock pot! It comes with promises of juicy meat, layers of flavor and mouth watering fun!

I am trying out a new pot roast recipe. I usually use the Lazy Pot Roast recipe from The Complete Meat Cookbook but just didn't feel like babysitting something in the oven for three hours today. I hit the world wide web in search of something that sounded delicious and/or inspired my own cooking ideas. I found total inspiration! Here is the recipe for some delicious goodness with the help of one of my favorite kitchen appliances:

Erin's Mouthwatering Pot Roast

1- 3.5lb. chuck roast
1 medium onion, sliced thinly
3 cloves garlic, minced
1 tbsp grated fresh ginger
1/4 c. Worcestershire sauce
1/2 c. soy sauce
4 c. water

Put the roast in your crock pot. Add onions, garlic & ginger. Pour liquids over the top (this should almost cover the meat). Cook on low for 10-12 hours or high for 5-6. Serve with mashed potatoes or shredded on rolls.

My roast will be served with a delicious Crispy Potato Roast from Martha Stewart Everyday Food issue 68 and a lovely green salad. Here's to rainy days and crock pot cooking!

Tuesday, March 2, 2010

Oranges...the spreadable fruit!

Ok, ok...so if we're friends on Facebook then you already know that I have been making marmalade like a mad woman! A friend of mine gave me a laundry basket full of oranges and I am trying desperately to cook them up before they go south. My first batch of marmalade was a double recipe of the one found in Ina Garten's cookbook Barefoot Contessa At Home and the results were EXTRAORDINARY! The rich caramel color of the marmalade is the first tip off that it's not your average King marmalade! As one recipient said "Rich, full flavored, dark, I LOVE it!" Then you have the actual meaty texture of the orange peel as you nibble (or gobble) your toast and sip some tea. It really is fantastic!
Tonight I started my second batch...but I felt experimentish so I substituted two handfuls of kumquats for a lemon. The scent is heavenly! Tonight is simply the prep, bring to a boil, add sugar and cool step. Tomorrow I will be cooking this lovely citrus mixture down until it is about half of its current volume and a scorching 220F. This process can take upwards of 4 hours so I'll be starting in early! Maybe I'll bake some bread while I wait...
Next up...Orange-Grapefruit Marmalade! I'm also very interested in adding candied ginger to a grapefruit marmalade...hmmmmm....we shall see what kind of spread I'll cook up next!
Ladies and gentlemen...start your toasters!

Friday, February 12, 2010

Apples, sore throats and urology...

In an attempt to promote better health I have been trying out all kinds of winter fruit, lately it's been all about apples! I found Honeycrisp apples and thought that they were simply amazing. Crunchy like a Granny Smith but sweet like a mild honey...yum! Thinking that this was the Meca of apples I purchased more and another variety, simply for the name, Ambrosia! Oh dang! The name says it all!!! I seriously could not believe how amazing the Ambrosia apples were! Crunchy, crisp, fresh, a soft floral taste, a little tiny zing of acid followed by a mouthful of sweetness better than any candy I've ever tasted!!! You seriously need to try them out!
Next up...my sore throat! It has seriously been the bane of my existence for the past month. Periodically covered with puss and nearly impossible to get healthy, my tonsils are the size of the Rockies and looking like two mounds of raw hamburger. Totally gross! The pain from the nasty throat has been incredible! My ears hurt, my throat hurts and even my tongue hurts! Bah!!! In the midst of this grossness my rad friend Sherri stopped by with lemons. Now you all know that I'm not that much of a citrus fan but those lemons made my day! I've been soothing my throat with lovely mugs of boiling hot water mixed with a couple tablespoons of honey and the juice of half a lemon! Simply brilliant! It is the only thing that has made my throat feel anywhere near human! High five to Sherri!
And now for urology! Oh yea that's right...I get to interpret next Tuesday for a urology appointment...when a male interpreter was requested....and I'm not a male interpreter...UMMMMMMMMMMMM I'm not sure what happens at urology appointments but I guess I will soon find out. I may not have all of the hilarious student stories that I used to have when I was teaching but I definitely am racking up the bizarre and beyond private information that I get exposed to in this new job. Hopefully I won't get "too" exposed (if you know what I mean)!

Sunday, February 7, 2010

Ode to a Delicious Fruit

I love OLIVES! Green or black, brined or water cured, pitted or not...olives are amazing! Lately I have been having HUGE olive cravings. I have been trying out all kinds of olives to see what I like best. The satisfaction of the larger varieties, all meaty and salty, seems to be the most gratifying. And yes, I must admit that amongst my olive sampling I came across one that tasted like poison gasoline...it was a tiny, pruny thing, all angry at the world for being plucked from its tree. Most unfortunate olive. All of this glorious olive tasting has put me in the mood to make one of my most favorite breads. It's a focaccia with fresh rosemary and kalamata olives pressed into its surface. The bread is yeasty and crisp with a full mouthful of flavor from all of that delicious olive juiciness. I'll let you know how it turns out! But in the meantime...go get some olives!!!!!